Lego robotics basics

In my summer of exploring robotics, one of the first ones I was playing with was the Lego EV3 kit.  There are a lot of good videos out that can help with programming the robots and understanding the variety of sensors that are available.  My go to series was from Kevin Briggs (https://www.youtube.com/watch?v=IuHaIE-auLQ) who has a perfect explanation (with code) to help you with the basics.

The main sensors available are the ultrasonic sensor, gyro-sensor, touch sensors, and the color sensor (this one is tricky because it needs to have “Lego” colors).  The sensors I worked the most with were the ultrasonic and the touch sensors, as I was most curious about makes a self-driving robot that can avoid obstacles.

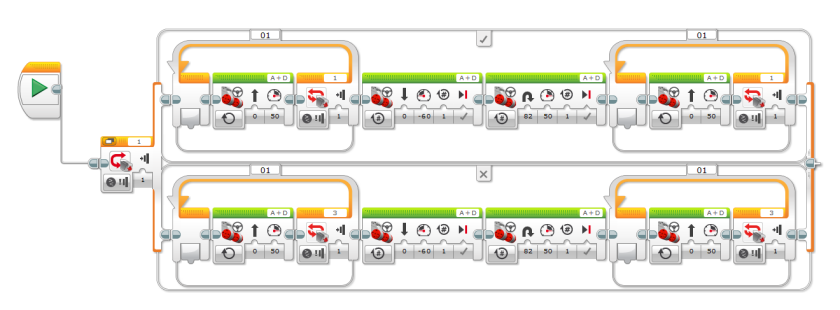
I had played around with one of these a year before but had a lot of trouble using the sensors that were available.  The biggest thing I noticed from the tutorials is that you need to setup the sensor, and then using a logic statement, you need to make the loop continue or not for autonomy.  Lego has a control setup in the loop structure but I was finding that it would not work appropriately because it was an end loop check rather than a beginning loop check.  For example, it will drive then look for the wall and then drive again, so if it is close to the wall it will crash as opposed to stopping when it gets within a range.  Also it is a lot easier to make the distance check work within the given range with a control statement setup at the start of a loop.

Last year I had students play with the robots to learn how to use them better and the students were unable to make the loops work correctly.  Unfortunately I did not have the time to look at it closer but now I can show them some basic programs that can help with understanding how the robot will move.

Below is an example of a distance sensor in action.  The robot will continue straight unless it is within 10cm of a wall (or object).  The structure is set up that it will check for a distance less than 10cm, if it is within that range, it will reverse and turn left, if it is not, it will drive forward.  This is in a loop so it will go on forever.

legocode

The best way to make a robot to be autonomous with the EV3, is to set it up similar to this.  You simply change the sensor (the yellow) and then the condition (the red), and then make it complete the steps in the true (check-mark) and the false (x) in order to make the robot function endlessly.

I find that this robot is perfect for high school students to learn about robotics and procedural learning because it is easy to use for basic movement, and the software comes pre-loaded with tutorials to teach them how to drive the car and learn the functions.  It is also nice because the students can try to build a better robot with the pieces and even the GyroBoy, that has instructions included in the software.  This is also nicer than Arduino for new learners because it does not require any code to write and is a good progression from scratch (and the hour of code).


Here is the touch sensor code:

legocode2.PNG

Arduino Robot

This summer I decided to have some fun with the various robotics we have at our school.  The first one I worked with was the Arduino microcontroller.  I bought a couple of different quicks from an offshore website (https://www.banggood.com/4WD-Smart-Robot-Car-Chassis-Kits-With-Strong-Magneto-Speed-Encoder-p-917007.html, https://www.banggood.com/2WD-Avoidance-Tracking-Smart-Robot-Car-Chassis-Kit-With-Speed-Encoder-Ultrasonic-For-Arduino-UNO-R3-p-1124282.html) that took a few weeks to arrive, but came with almost all the parts needed (extra wiring was not included, and for the second car I wanted the L298N Motor controller).

It was somewhat tricky to get started, I do not have a background in wiring and electrical work (have wired one Arduino before with a very detailed video) on microcontrollers but this one was not too difficult and has a lot of similar videos that can help.

The trickiest part of the build was linking up the motors to the motor controller and then linking that to the Arduino (or the motor shield, which I have done both now).  The kits do need additional power supplies (the only downside to using the motor control), so I am currently waiting for the 9V battery adapters from Amazon before I can let them drive around my garage freely.

I learned that the fear I had with wiring it wrong was not one I should worry about.  The forgiving part of the arduino is that as long as you identify it correctly in the code as a global variable to the correct pin it will work.  You will need to also connect the ground to the motor and the arduino board ground (on the port side).  The motor controller is beneficial because you can use it to combine motors, change speeds, and provide it with additional power to make it function correctly.  The first car I made had only one power supply to a breadboard and it was unable to work correctly.  Everytime it was connected to the PC is would drive at the right speed and then when connected to battery it would go much faster.

I found the one thing missing from the readings I found was that it did not explain the controllers on the motors easily, so I am labeling it here. Using L298N motor:
– ENA/b controls the speed
– IN1 right motor forward movement if set to high (IN2 must be set to low)
– IN2 right motor reverse movement if set high (IN1 must be set to low)
– IN1 left motor forward movement if set to high (IN4 must be set to low)
– IN2 left motor reverse movement if set high (IN3 must be set to low)
– setting all motors to low will turn it off (like using breaks)

here is the code I have used.

// motor one
int enA = 10;
int in1 = 9;//for
int in2 = 8;//rev
// motor two
int enB = 5;
int in3 = 7;//for
int in4 = 6;//rev

void setup()
{
// set all the motor control pins to outputs
pinMode(enA, OUTPUT);
pinMode(enB, OUTPUT);
pinMode(in1, OUTPUT);
pinMode(in2, OUTPUT);
pinMode(in3, OUTPUT);
pinMode(in4, OUTPUT);
}

void demoOne()
{
// this function will run the motors in both directions at a fixed speed
// turn on motor A
digitalWrite(in1, HIGH);
digitalWrite(in2, LOW);
// set speed to 200 out of possible range 0~255
analogWrite(enA, 200);

// turn on motor B
digitalWrite(in3, HIGH);
digitalWrite(in4, LOW);
// set speed to 200 out of possible range 0~255
analogWrite(enB, 200);

delay(2000);

// now change motor directions
digitalWrite(in1, LOW);
digitalWrite(in2, HIGH);
digitalWrite(in3, LOW);
digitalWrite(in4, HIGH);

delay(2000);

// now turn off motors
digitalWrite(in1, LOW);
digitalWrite(in2, LOW);
digitalWrite(in3, LOW);
digitalWrite(in4, LOW);
}

void demoThree()
{
//left turn
digitalWrite(in1, LOW);
digitalWrite(in2, HIGH);
digitalWrite(in3, HIGH);
digitalWrite(in4, LOW);
analogWrite(enB, 200);
analogWrite(enA, 200);
delay(1000);

//right turn
digitalWrite(in1, HIGH);
digitalWrite(in2, LOW);
digitalWrite(in3, LOW);
digitalWrite(in4, HIGH);
analogWrite(enB, 200);
analogWrite(enA, 200);
}

void loop()
{
demoOne();
delay(1000);
demoThree();
delay(1000);
}

Attached are some photos as well of the designs.  I will post again on this when I have them moving freely.  And I will post about the utlrasonic sensor as well.

Empowering the learners through knowledge building

Last year I decided to go through the idea of knowledge building in math.  I was working with the grade 11 college math curriculum and was looking at the personal finance aspect.  Every semester we cover the content they have great questions and I always got excited to answer their problems without thinking about the learning I was taking away from them.  At our school we have looked at the power of questioning and how to use the idea of knowledge building to develop their own understanding of questions that cannot be “Googled”.  

I had a lot of trouble with the concept at first because I was unable to step outside of my comfort zone and let the students fully drive the learning that was taking place.  I was also very nervous that the students would not take the task seriously and would not understand any of the material they were supposed to from this type of learning model.  Although I had those fears, I decided to still partake in knowledge building in math, something that is not tried very often.

The first thing we did was looked at were the different concepts that we were going to cover (buying a car, owning a home, investments, having a credit card, and student debt).  I was unsure how to spark questions from the students so I gave them infographics and chart paper to start generating ideas and questions they had about the topics we were covering.  Students started with very basic questions and then moved towards more complex ones that would help them acquire new knowledge.

I was lucky to have two teachers who were more comfortable with the idea of questioning and knowledge building in the school to help my students go from very basic and closed questions, to much more complex and open ended questions.  Some students went from ideas like “what type of home is better new or old” to “When I am looking to buy a home, is it going to be better value to purchase an older home or a newer home?” And other questions like “what is a credit score” to “How do credit scores impact us as buyers and how can we change our score to help us for future big purchases”.  Although the students didn’t come up with the exact wording, we were able to cooperatively Able to think deeper about personal finance.

Students performed group research for a couple of days to help them support the question they had with facts for or against there stance. The final products were to be a pros and cons list and then an answer to their question that showed their research helped them answer the question in some way.  Students were also able to conference with me which proved to be more beneficial because they were able to articulate more when it came around to them talking about what they learned instead of writing it.  Some students were able to expand on the knowledge we had from the unit, some were able to gather the same knowledge from the lessons, and others were able to go and develop their own viewpoint on the knowledge that they acquired.

We are trying to do this more in our math classes as we hope they will put the ownership back on the students, make use the facilitator of knowledge rather than the keeper, and help the students learn that their isn’t a definite answer to all of the questions we can develop, but we can get their from the skills we have.  I would like to try it with my grade 10 academic class in a few weeks to drive the question of why we learn trigonometry in class, and to see if they can find the different laws and rules that we have for solving missing sides from research.  I have used simple questioning in computer science to setup the 20 time projects by simply asking, what new knowledge can you gather if you spent every Friday trying to learn something new.

I am still struggling to get all the students engaged and still have difficulty with the ones that simply want to ask why to all the content, but we have made some big strides to connecting the missing pieces from the way we used to teach lessons and the applications of them rather than focusing on the applications and then learning the skills and the big ideas of the course.

The Initial Challenges of my E-Learning Course

This year I am taking on a new adventure, teaching online grade 11 computer science.  My first thoughts were excitement on the new opportunity, but also went towards fear of how to connect with students when all I would see is their text based questions and responses to problems.  Some of my other fears about taking on an elearning course were the ideas of tracking down students effectively, providing timely feedback, creating a sense of belonging for all students (even ones who went at their own pace), and keeping students engaged (since they were at their own home).

I found that the troubles I feared were ones I focused on and worked at so that they did not hinder the progress of my students and did not effect my teaching practice.  I tried to mark the weekly assignments within 4 days so that the students could use the descriptive feedback for the next assignments.

It was hard to see if the students were engaged as I could not look at their screens and know if they were present (an area I am looking at working on).  Students were able to interact in lessons using a chat feature and were able to share their screens (at the request of the host).  I was also unaware of the number of no-shows that would happen in the live classes as I assumed it would be mandatory like physical school classes.

Throughout the term I looked at some new ways to engage them (short snippets of code, google form exit cards) but was still finding not a lot of participation from the students who I feared were not there and for the ones that watched later.  My big question is to those who have/are online teachers, how do you check for understanding in formative ways?  Also how do you gauge the level of understanding without using a test or assignment through the content modules?

Linking the course continuum to gamification

Last semester we were looking at creating a course continuum to have further student engagement.  The concept of the continuum is similar to a big idea of a course which would lead to backwards design.  Our continuum was based off the grade 11 university prep functions course.  The continuum is still a work in progress but showed a lot of improvement throughout the semester.  The second major goal of the continuum was to help students further develop their metacognitive thinking.

Students in my class liked to use it as a levelling system that provided them with a chance to “gain experience” while working towards their goal of understanding the full scope of the topic.  I found that with their energy I got into it as well and decided to base the way I taught on my own “experience points”.  One day I made a mathematical error and made sure that I couldn’t “Level Up” because I needed to make sure that I understand it better before.

Although I saw a lot of positive results, it was tricky to get the students to buy into the system and try to take risks neccessary to make this a further metacognitive process.   I found that some were able to take the work we did in class and start to apply it to the learning process, but there were too many who waited for us to discuss it together because of the fear of getting the answer wrong.

Overall I think that it was a good new tool that I would like to use in other courses, once I fully understood the way that I could implement it into different areas.  Below I attached the continuum so that anyone could provide feedback for me.

MCR3UR COURSE CONTINUUM

CS Teachers Conference at UWaterloo

I had the pleasure of attending this 3 day conference where I was able to learn some older and new technologies that are available from the university as well as things that other educators are doing in their classrooms daily.  For me, it was an amazing opportunity to learn because I have been focused on my math teaching for the past 3 years.   There were come key themes that I took away and some questions I have for the next steps.

The first thing that I continuously thought about (as well as something that I heard from others) was the desire from our students on instantaneous feedback.  Students want to know how they did, if they need to improve, and how they need to improve as soon as they complete a task.  Although this may sound like exciting news, it is not always as great because some students do not want to think about how they can improve, but rather want you to tell them how to improve.

One way the University of Waterloo and other websites provide a way for instantaneous feedback in coding is through “tutorials” where students do not have to download the IDE.  Some examples we looked at in the conference were CSCircles, Codingbat, and Websheets (this is a newer one where you create your own code).  All of these provide some information on the program, the elements you will be tested on, and then a space to code the program required.  When students “ran” the code, the sites would compile and run test cases against the solution code.  It would give error messages and give results based on the test cases.  I found the test cases very helpful because it allowed to student to see that you need a number of test cases and need to make sure that you test a lot to find subtle problems.  They do not all track the students progress as they are to complement the student learning rather than be the classroom they are in.

The other concept that a lot of teachers were implementing was the idea of using cloud services to submit files and to promote collaboration on code.  One industry tool that is constantly being used for coding and other services is Git and Github.  This is a neat tool that creates online repositories and then allows you to share the code with anyone you allow (free Github makes all code public).  In order to collaborate together, you need to give special permission to the other users.  In our session we were all able to access the code presented in an easy way as we didn’t have to download the files and then locate the package to open.  The only downside was that you needed an account and some boards block the use of Git and Github.  Once I get the handle on this, I will hope to use it in my own classes so that students are able to work together and learn skills that the workplace already uses.

The last take away was not the newest concept, but was something that I would like to practice in my classes (even math) and that was the idea of Genius Hour.  The one teacher took it a step forward and talked about how they implement aspects of project management into the genius hour sessions.  In order to work through their personal project they are required to complete the basic components involved in project management.  Every session also included a basic exit card that had key ideas, such as what they learned, what they did, where they need help, and what their next steps were.

As always it was great to go to a conference that stretched my thinking and made me reflect on where I could go next with my learning.

The power of Desmos

Last year I posted about how we could replace the ti-83 calculators with Geogebra because of the ability to have multiple screens open and be able to do more regression models.  I am not discrediting Geogebra, but I feel that Desmos has been great because of it’s ability to be used on multiple platforms.  This year Desmos has come out with the ability to also complete these regressions and combine it with the original power of Desmos, manipulating in real time.

Having students able to use Desmos on their phone, a school iPad, or a school computer/laptop has been vital for our investigations as we do not have a one to one ratio of tech to student.  It was also great to hear some of the students say “Oh, so I can do this at home?” Also seeing them use their phone for a productive app has been a good transition from all simple games they like to play instead.

I have not used it for all the regression models, but found that it worked really well with teaching about a line of best fit to the grade 9 academic class.  They were told vaguely to graph a line that best fits the data and then we compared it to the one Desmos created.  The students then created the (correct) rules for applying a line of best fit to any model.  It was a great visual to see that it did not have to pass through the origin, and that it does try to place an equal amount of points above and below the line.

Below I have some samples of what it looks like to have the regression models.  I was able to copy data straight from google sheets which was very efficient and easy instead of typing data.

I have also started using it for investigations with linear relations and so far it has helped students with manipulation of the information and visual representations. It is a learning curve as most are used to having information presented to them and then complete the tasks with their new information.

Linear Regression

Quadratic Regression

Exponential Regression

Community Circle In a Senior Class

Today was day two of restorative justice which saw us in the circles as a participant as well as getting a chance to facilitate.  I found this experience helped me gain the confidence needed to run circles more frequently in my classes.  

I didn’t post this last time but the idea of restorative practice is to ask the right questions that will lead students to understand their actions had implications because they had to think deeper.  The following questions will help get away from the “I don’t know” response students give when we used to ask “why did you do that”.

 
I have used these before without knowledge of the program and have found they do get students to think and they lead to more meaningful steps to solving problems. 

Last year I did complete tribes training which I feel helped me understand the basics of the circle and the need for consistent use so that students saw it as multidimensional.  Those are the two keys to being successful with this practice.  If you don’t build the foundation with the students and have them experience how powerful the circle can be for getting your voice heard, shy students will not gain the confidence needed to share their input into the classroom.  The other part is using it for other purposes so that students start to gain the idea of community and that the circle is for sharing, good and bad.

The major trouble I have seen in the past and even today is the idea that in order to use these circles you need to gain a level of trust with your class.  In a secondary classroom this proves to be more difficult as we only have them for 76 minutes a day, try to implement our rules, and cram curriculum into their head.  This year I have found that I sense a stronger community with my students, and that is why last Thursday I attempted an impromptu circle.

My grade 11 class was upset with their results on the last test.  In order to diffuse the situation and have the students still trust that I had their best interest at heart, I formed a circle.  I explained the rules about no put downs, which is already established day to day, and that you had a right to pass if you weren’t comfortable sharing this time.  I was nervous as I had never facilitated a circle before but knew that this was needed more than new content to keep the class cohesive.  The prompt was the key as I focused on what the class could do better to help them prepare (what I could do) and what they could do/would like to do better in the future.  By making them think about the second part it took away from the blame on me or someone else and made it into a we need to do all these things to make it better.

At the end a couple of students turned and said, this was amazing and appreciated it because it let them voice what they didn’t like and what we could do to make the future tests and assessments better.  Since Thursday I have found that they are doing the things they said they would to better prepare and are appreciating the smaller things I have been doing to meet the needs they set for their success. 

I am happy to have been part of both sessions (tribes and restorative practice) and would recommend one, or both, to any teacher as a way of changing the mentality of the class and as a way to make a group closer, even for 76 minutes.

My next steps are to bring it to my other class and have check ins on Monday and Friday to see how they are feeling in order to help them socially, emotionally, and academically.

Restorative Practice – the theory behind it

Today for NTIP we had the opportunity to learn about the idea of restorative practice.  The first message we received was how this framework helps us, as teachers, become better at being fair, firm, and consistent.  This idea plays into the entire framework of it.  In order to be effective as a teacher that practices restorative methods you need to be able to find the perfect balance.  This leads you away from creating the rules that students decrypt in order to understand why towards a culture of creating rules with students that they know and they agree upon.

The other key takeaway from this session was the idea of the restoration part of the framework.  The key is not what discipline the student is receiving but really the idea of owning up for your mistake and learning how it effected the others in your class community.  The other piece is the reintegration into the community after they have had this issue.  We spoke about how the old model of discipline lead towards shame, insecurity, and self-conscience thoughts.  When we had top-down discipline and did not have reintegration we would hope the students would stop the action and then learn the impact their actions had.  The restorative practice takes away the guessing game students have when trying to understand the way they impacted others.  To do this the community meets in a circle.

The idea of the circle comes from aboriginal mentality of community and equality in the group.  Everyone can see each other and no one feels a hierarchy is in place.  In the circle each person has a chance to talk about their feelings and how they were effected by the situation.  I think this is great because seeing people and hearing their tone would convey the message to the perpetrator but would also help them begin to build empathy.

I really like the idea of restorative justice because I have used the phrases from my teaching overseas and saw the benefits.  From the brief description what do you think?

Dr. Ross Greene and Collaborative Problem Solving

I meant to blog this shortly after I saw him, but got delayed on writing this piece.  Dr. Greene has two books so far “The Explosive Child” and “Lost at School”. This post will focus on the latter of the two books which looks at why behavioural challenging students are failing in our system and how we are failing them.  I am only going to give some of the key takeaways from the talk because I think that reading his book and thinking about changing your own mindset on this area could be beneficial to the students we all teach.

I had the honour of seeing a presentation about a month ago from Dr. Greene.  It was insightful and was amazing to see the different ways that we could work with students to help them solve their problems.  The first part of his talk was something that I have come to realize, but was great to hear again, “Children do well if they can”.  All students want to do well and want to be successful, the students that have behaviour challenges just have other factors in the way and we (as teachers) need to help them out.

The main idea around the book and the talk was about how the students with challenging behaviours are challenging because they lack the skills to not be challenging.  It is a simple idea and thought but is very powerful and is a different lens to look through in the life of a student.  We used to think that it was the parent, or they were unmotivated, or attention seekers, or good manipulators, or even that they were testing limits…but these are wrong.  Some of the comical counterexamples are that if they were good manipulators they would be doing it without us knowing, we all test limits and can’t blame any student for doing the same thing, and that we as adults seek attention all the time to get our way; so why are we getting mad at children for  modelling what they see.  These were all old world ideas and if the strategies we had to fix them worked, we wouldn’t still be having these problems today.

He outlined some of the big ideas of his book which revolved around the skills that behavioural challenging students lacked.  They were executive skills (hindsight, forethought, impulse control), language processing and communication skills, emotional skills, cognitive skills (grey thinking), and social skills.  The amazing part of this discussion was that he did not place any of the blame on the parenting techniques a student was exposed to (something most of us do) and didn’t look at any of the psychiatric diagnoses that we are all expecting from a topic like this.  When he described some of the situations that displayed each one of the skills, it was easy to picture a student that I had taught or currently taught (in my short 3 year experience), which made talk that much more powerful.

I order to help these students he created a document to outline the different problems we see and strategies to help students and teacher collaboratively fix them.  It is all collaborative because in that model there are winners and winners (no losers if everyone agrees on the strategies).  You can find these resources at livesinthebalance.org and they are all free!

The strategy is the ALSUP (Assessment of Lagging Skills and Unsolved Problems).  It’s a simple idea that can have a lot of impact on the lives of the children we teach.  Teachers of the student meet and as soon as one person identifies a problem they see, all the teachers discuss where they may have seen a sign of this.  This process is continued until the sheet is complete.  The key things are that there are no theories here and they need to be specific to what has been seen.  Once this is complete then the teachers decide which problem they will help the student solve and then the meetings with the student take place.

The reason for the meetings with students is because it helps them take ownership of the problem and shows that you have empathy as well.  Its better than an adult imposed suggestion because the student may feel that the concern is not met and they are simply complying to make sure that they are fitting the rules of the class.  The other alternative is to leave it aside and not work through the problem, which only leads to further concerns as the problem grows when left unsolved.  There are some guidelines for the meetings but it can be overwhelming to see all the different parts of this model at once.

I know that it seems like some of the findings he presented are trivial and that it just creates another “job” to do, but I have been in a school where problems were brushed aside or solved from a unilateral perspective and it did not lead to anything but worse behaviour.  I believe in the statement that children do well if they can and are given the opportunity to succeed.  I have seen it in my applied level class this semester that if students are given the chance to be successful and feel the empathy from you, they will work their best to meet the expectations you set.

My question to you is, what do you think about this topic? How do we proactively deal with students who have behavioural concerns and how do we get them to fit back into our system effectively?